
UPDATE: I’m leaving this series up for historical purposes, but please note that I no longer recommend Ubuntu Core or snaps for use in robotics.
This is the third blog post in this series about creating your first robot with ROS and Ubuntu Core. In the previous post you were introduced to the Robot Operating System (ROS), and got your robot moving by ROSifying one of the CamJam worksheets. Today we’re going to move beyond the CamJam worksheets, and work toward having our robot remotely controlled by focusing on our wireless controller: getting data out of it and into ROS messages.
As I mentioned in part 1, I’m using the wireless controller from the Pi Hut, but really the only requirement to follow this post exactly is that it shows up as /dev/input/jsX on the Pi (where X is some number, typically 0). I have a wired Xbox 360 controller that works the same way, for example.
Alright, let’s get started! Remember that this is also a video series, feel free to watch the video version of this post:
Step 1: Get data out of the controller
One of the benefits of using ROS is that a lot of the problems are already solved for us. In this case, there’s already a ROS node that exists solely to read data from controllers like ours, called joy. Get into your classic shell, and install it:
$ sudo apt install ros-kinetic-joy
Insert the USB receiver for the controller into the Pi, and you should see it appear as /dev/input/js0. Open up two others terminals, and get into your classic shell in each (so now you have three). On one terminal, run the master:
$ roscore
On another terminal, run the joy node:
$ rosrun joy joy_node
[ INFO] [1513274242.219112701]: Opened joystick: /dev/input/js0. deadzone_: 0.050000.
On the third terminal, let’s take a look at what’s coming out of the joy node. First, let’s see what topics are available:
$ rostopic list
/diagnostics
/joy
/rosout
/rosout_agg
Take note of the /joy topic. That’s being published by the joy node. Let’s take a look. Run:
$ rostopic echo /joy
Nothing should happen at first. Now turn on your controller, and start moving joysticks about and pressing buttons. You should see all sorts of stuff start spewing, looking something like this:
header:
seq: 1
stamp:
secs: 1513274448
nsecs: 114444863
frame_id: ''
axes: [0.0, 0.08846031129360199, 0.0, 0.0, 0.0, 0.0, 0.0, 0.0]
buttons: [0, 0, 0, 0, 0, 0, 0, 0, 0, 0, 0, 0, 0, 0, 0, 0]
---
header:
seq: 2
stamp:
secs: 1513274448
nsecs: 130450677
frame_id: ''
axes: [0.0, 0.26209455728530884, 0.0, 0.0, 0.0, 0.0, 0.0, 0.0]
buttons: [0, 0, 0, 0, 0, 0, 0, 0, 0, 0, 0, 0, 0, 0, 0, 0]
---
That’s a bunch of Joy messages representing the current state of the controller: joysticks, buttons, everything. Whenever you move a stick or press a button, more messages are sent showing the state change. That saved us a bunch of work! Go ahead and CTRL+C out of rostopic, the joy node, and roscore.
Step 2: How do we control our robot?
So we’re able to get data out of the controller, but that data is still somewhat raw. Remember that, at the end of the day, the robot moves and turns via changes in its wheel speeds. How do we get from these controller messages to wheel speeds? We could totally write a new node that subscribes to the controller messages, pulls out the joystick movements, and turns those into wheel speeds. However, that would tightly couple the robot driver to the controller, which would be short-sighted. Is there not a more generic way to request that the robot move and turn? Indeed there is.
The answer can be found by looking forward to how we would make the robot autonomous. This would probably utilize the ROS navigation stack, which was written for arbitrary robots, and outlines exactly how we should control our robot with its first hardware requirement:
“[This software] is meant for both differential drive and holonomic wheeled robots only. It assumes that the mobile base is controlled by sending desired velocity commands to achieve in the form of: x velocity, y velocity, theta velocity.”
~ The ROS Navigation Stack
Okay, so what does this mean? The robot we have is a differential drive robot. That means it can move forward, backward, and turn left and right, all with wheels that don’t steer like your car (which would be e.g. Ackermann steering). It does this by rotating the wheels at different speeds and/or in different directions. It cannot, however, move side-to-side. Wheeled holonomic systems are more magical in that they can move forward, backward, turn left and right, and move side-to-side. These typically use either omni wheels or mecanum wheels.
We can make this easier to understand by drawing the movements possible by each drive type:
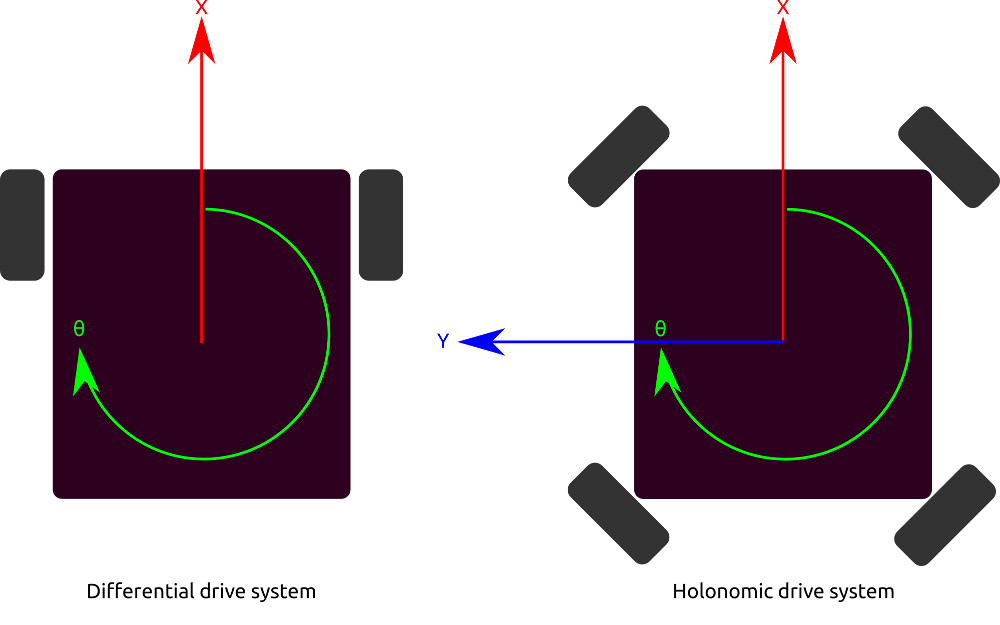
On the left we have the differential drive system, like our robot. It can move in a linear fashion along the red line we labeled X (i.e. it can move forward and backward), and it can move in an angular fashion (rotate) around the green circle we labeled θ (theta). On the right we have the holonomic drive system, which can do exactly the same as the differential system but can also move along the blue line we labeled Y (i.e. it can move side-to-side).
Concretely, the ROS navigation stack supports both systems by supplying commands that are velocities in each of these directions (X, Y, and θ). So let’s make our robot support those types of commands! Since our system doesn’t support Y velocities, we’ll just be using X and θ. ROS has a standard message that is used for exactly this type of data: the Twist message, which consists of a set of linear and angular velocities. So let’s turn our Joy messages into Twist messages.
Step 3: Turn Joy messages into Twist messages
I might sound like a bit of a broken record, but guess what: this already exists, too! It’s called teleop_twist_joy. Let’s install it:
$ sudo apt install ros-kinetic-teleop-twist-joy
Now open four terminals running the classic shell (I know, this is getting ridiculous). In one, run roscore again:
$ roscore
In another, run the joy node again:
$ rosrun joy joy_node
[ INFO] [1513274242.219112701]: Opened joystick: /dev/input/js0. deadzone_: 0.050000.
In the third, run the newly-installed teleop node:
$ rosrun teleop_twist_joy teleop_node
[ INFO] [1513286128.076671780]: Teleop enable button 0.
[ INFO] [1513286128.077269945]: Linear axis x on 1 at scale 0.500000.
[ INFO] [1513286128.077666187]: Angular axis yaw on 0 at scale 0.500000.
And finally, in the fourth let’s poke at it. First, take a look at the available topics:
$ rostopic list
/cmd_vel
/diagnostics
/joy
/rosout
/rosout_agg
We know that the /joy topic contains the controller data, but /cmd_vel is new. That’s the conventional name for Twist-based velocity commands. Let’s take a look at those:
$ rostopic echo /cmd_vel
As before, nothing should happen at first. Then turn on your controller and start moving the left joystick. Psych! That doesn’t do anything either. Because the teleop node was written for remote control in mind, it implements a safety button as a sort of “dead-man’s switch” if you will. By default, this is button 0, which on my controller is the X button. Hold down that button, and then move the left joystick, and you should start seeing velocity commands start scrolling past, like this:
linear:
 x: 0.0
 y: 0.0
 z: 0.0
angular:
 x: 0.0
 y: 0.0
 z: 0.0
---
linear:
 x: 0.0225298888981
 y: 0.0
 z: 0.0
angular:
 x: 0.0
 y: 0.0
 z: 0.0
---
You’ll notice that while there are a bunch of components to this message, only two of the components actually change depending on how you move that joystick: the linear X component, and the angular Z component. This actually relates back to the picture in step 2: X corresponds to the red X line we drew, and Z corresponds to the green θ circle. So X values mean “move forward or backward this fast” and Z values mean “rotate left or right this fast”. Exactly what we need!
In the next post in this series, we’ll rewrite the simple “driver” node we created last time to accept Twist messages and turn them into wheel speeds.